Building an Automated Content Marketing System with n8n and Airtable
I faced a common challenge: how to efficiently manage, approve, and distribute content across multiple platforms without spending hours on manual posting and formatting. The solution? A custom-built content marketing automation system powered by n8n and Airtable.
In this post, I’ll walk you through how I built a system that automatically transforms blog posts into optimised social media content, manages approvals through Airtable, and posts to LinkedIn with room for future expansion to other platforms.
The Problem: Content Management at Scale
Creating quality technical content is time-consuming enough without the overhead of:
- Manual cross-posting to different social media platforms
- Reformatting content for each platform’s unique style and character limits
- Tracking approval workflows across multiple stakeholders
- Maintaining consistency in brand voice and messaging
- Scheduling posts at optimal times for engagement
The requirements were clear: automate content distribution, maintain quality through approval workflows, optimize content for each platform, and provide visibility into the content pipeline.
The Solution: n8n + Airtable Automation
The architecture combines n8n (a powerful workflow automation tool) with Airtable (a flexible database with spreadsheet-like interface) to create a comprehensive content management system.
Why n8n?
- Self-hosted: Complete control over data and workflows
- Visual workflow builder: Easy to understand and modify
- Extensive integrations: Connects to 200+ services
- Custom logic: JavaScript code nodes for complex transformations
- Webhook support: Trigger workflows from external sources
Why Airtable?
- Intuitive interface: Spreadsheet-like UI that non-technical users understand
- Rich field types: Support for attachments, checkboxes, formulas
- API-first design: Easy integration with automation tools
- Collaboration features: Comments, mentions, and approval workflows
- Views and filters: Organize content by status, platform, date
The Workflow Architecture
The system consists of three main workflows that work together seamlessly:
1. Content Ingestion via Webhook

The workflow starts with a webhook endpoint that receives blog post data:
{
  "title": "Building an Automated Content System",
  "author": "Markus Mulder",
  "content": "Full blog post content in markdown...",
  "created": "2025-11-01"
}
Key Components:
- Webhook trigger: Accepts POST requests with blog post data
- Split Out node: Extracts individual fields (title, author, content, created date)
- Data transformation: Prepares content for AI processing
This webhook can be triggered from RSS feed monitors for external content, or manual API calls for one-off content submissions.
2. AI-Powered Social Media Copywriting
The heart of the system is an AI agent that transforms long-form blog content into platform-optimised social media posts. The workflow uses a comprehensive prompt engineering approach:
The AI Agent analyzes:
- Core thesis and key insights from the blog post
- Target audience and technical level
- Notable statistics and code examples
- Problem-solution framing
Then generates:
LinkedIn Post (120-220 words)
- Attention-grabbing hook (18 words or fewer)
- 3-5 bullet points with specific, quantified results
- Optional code insight (1 line maximum)
- Clear call-to-action with link
- 3-5 relevant hashtags
X/Twitter Post (260 characters or fewer)
- Single focused insight or metric
- Brief code snippet (if critical)
- Link to full content
- 1-2 hashtags
Photorealistic Image Prompt
- Professional photography style descriptions
- Natural lighting specifications
- Realistic color palettes
- Avoids AI-generated cliches
Example Output:
{
  "linkedInCopy": "We cut our AWS bill from $47K to $15K per month without touching code.\n\n- Migrated to ARM-based Lambdas: 68% cost reduction\n- Implemented CloudFront caching: 89% fewer origin requests\n- Right-sized DynamoDB tables: $3K/month savings\n- Added cost monitoring alerts: proactive optimization\n\nFull breakdown with Terraform configs: [link]\n\n#AWS #CloudOptimization #DevOps #Terraform #CostSavings",

  "xCopy": "Switched to ARM Lambdas + CloudFront caching. AWS bill dropped from $47K to $15K/mo. Full guide: [link] #AWS #DevOps",

  "imagePrompt": "Professional photography of DevOps engineer reviewing AWS cost dashboard on dual monitors in contemporary office. Real billing charts and resource utilization graphs visible. Soft overhead lighting, clean workspace. Photorealistic style. Color palette: slate gray, white, teal accents."
}
The AI prompt is extensive (over 1000 lines) and includes strict formatting requirements, platform-specific best practices, examples of good vs. poor content, validation checklists, and brand alignment guidelines.
This ensures every generated post is professional and technically accurate, platform-optimised for engagement, on-brand and consistent, and action-oriented with clear CTAs.
3. Airtable Approval Workflow
Once content is generated, it’s sent to Airtable for review and approval:
Airtable Base Structure:
- Content ID: Unique identifier
- Source Title: Original blog post headline
- LinkedIn Copy: Generated LinkedIn post
- Twitter Copy: Generated X/Twitter post
- Image Prompt: AI image generation prompt
- Source Content: Original markdown content
- Approval Status: Pending / Approved / Rejected / Published
- Scheduled Date: When to publish
- Platform: LinkedIn, Twitter, Instagram (future)
- Notes: Reviewer comments and edits
Approval Process:
- Content arrives in “Pending” status
- Reviewer (me) can:
- Approve as-is
- Edit copy before approving
- Reject with notes for regeneration
- Schedule for specific publish date
- Approved content triggers publishing workflow
Benefits of Airtable:
- Visual overview: See all content at a glance
- Easy editing: Make tweaks directly in the spreadsheet
- Collaboration: Share with team members if needed
- Audit trail: Track what was published when
- Analytics: Track performance by post type, platform, etc.
4. Automated Content Scraping

The system also includes an RSS feed scraper that:
- Monitors specified RSS feeds for new technical content
- Filters content by keywords and relevance
- Extracts article text and metadata
- Sends to the same AI copywriting workflow
- Allows me to curate and share external content
This is particularly useful for staying current with industry trends, sharing valuable content from thought leaders, building authority by curating quality resources, and filling content gaps with relevant external posts.
The Publishing Pipeline
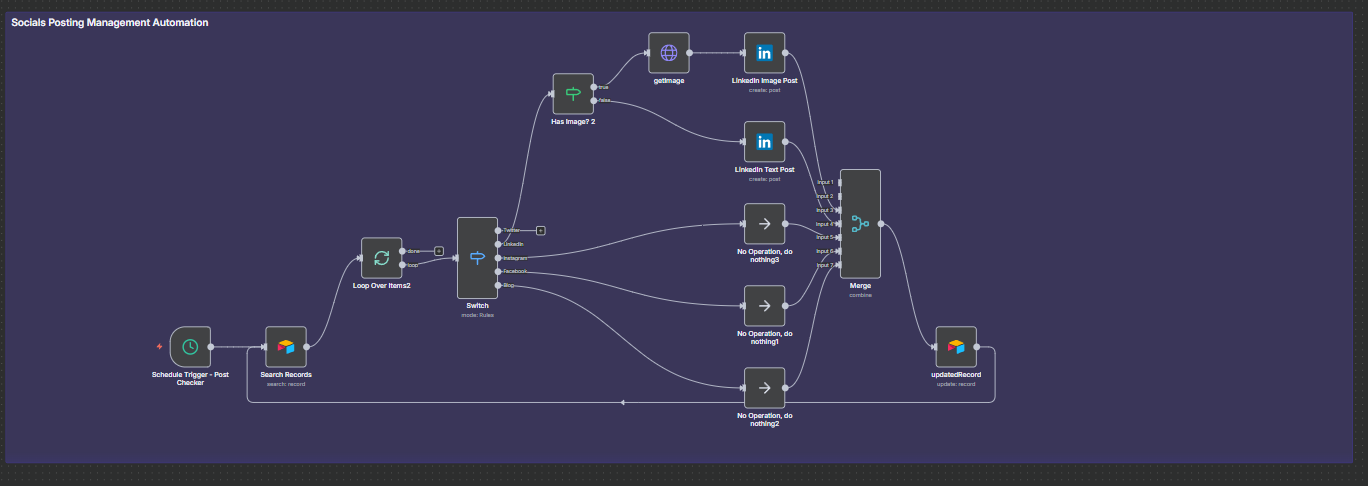
Once content is approved in Airtable, the publishing workflow:
- Monitors Airtable for rows with “Approved” status
- Generates social media images using the AI-generated prompt (via DALL-E or Midjourney API)
- Posts to LinkedIn with optimised copy, generated image, and proper hashtags and formatting
- Updates Airtable status to “Published”
- Logs results for analytics and troubleshooting
Currently Implemented:
- LinkedIn posting with rich media
- Image generation integration
- Status tracking in Airtable
Future Expansions:
- X/Twitter posting
- Instagram stories/posts
- Cross-posting to Dev.to and Hashnode
- Newsletter integration (Substack/ConvertKit)
- Analytics dashboard
The Technical Implementation
n8n Workflow Nodes
The workflows utilize these key n8n nodes:
Trigger Nodes:
Webhook: Receives incoming content via HTTP POSTCron: Scheduled checks for approved contentAirtable Trigger: Monitors for status changes
Data Processing:
Split Out: Extracts fields from JSON payloadsCode: Custom JavaScript for data transformationSet: Maps fields for downstream nodes
AI Integration:
OpenAI: Runs the AI copywriting promptHTTP Request: Calls image generation APIs
Output Nodes:
Airtable: Creates/updates recordsLinkedIn: Posts to LinkedIn company/personal pageEmail: Sends notifications on errors
Key Code Snippets
Webhook Data Extraction:
// Split out the incoming webhook data
const { title, author, content, created } = $json.body;

return {
  "body.title": title,
  "body.author": author,
  "body.content": content,
  "body.created": created,
};
Airtable Record Creation:
// Create Airtable record with generated content
return {
  fields: {
    "Source Title": $json.sourceHeadline,
    "LinkedIn Copy": $json.linkedInCopy,
    "Twitter Copy": $json.xCopy,
    "Image Prompt": $json.imagePrompt,
    "Source Content": $json.blogSource,
    Status: "Pending",
    Created: new Date().toISOString(),
  },
};
Benefits and Results
Since implementing this system, I’ve experienced:
Time Savings
- 90% reduction in time spent on social media posting
- Automated formatting saves 15-20 minutes per post
- Batch approval process instead of individual posts
Consistency
- Unified brand voice across all platforms
- Professional quality maintained through AI prompts
- Hashtag strategy consistently applied
Quality
- AI optimization for each platform’s best practices
- Review process ensures accuracy before publishing
- Analytics tracking to improve over time
Scalability
- Easy to add new platforms (just clone and modify workflows)
- Can handle multiple posts per day without manual effort
- Supports team collaboration as I grow
Setting Up Your Own System
Want to build something similar? Here’s a high-level roadmap:
1. Set Up n8n
# Docker installation (recommended)
docker run -d \
  --name n8n \
  -p 5678:5678 \
  -v ~/.n8n:/home/node/.n8n \
  n8nio/n8n

# Access at http://localhost:5678
2. Create Airtable Base
- Sign up for Airtable (free tier works great)
- Create a base with fields: Title, Copy, Status, Platform, Scheduled Date
- Get your API key from account settings
3. Build the Webhook Workflow
- Add Webhook trigger node
- Configure to accept POST requests
- Add Split Out node to extract fields
- Test with Postman or curl
4. Integrate AI Copywriting
- Get OpenAI API key
- Create AI node with copywriting prompt
- Test with sample blog content
- Refine prompt based on output quality
5. Connect to Airtable
- Add Airtable node (Create Record)
- Map AI output to Airtable fields
- Test end-to-end workflow
6. Build Publishing Workflow
- Add Airtable Trigger (watches for “Approved” status)
- Add LinkedIn node with credentials
- Add image generation (optional)
- Add status update back to Airtable
Future Enhancements
This system is constantly evolving. Planned improvements include:
Short-term
- X/Twitter integration: Complete the social media trio
- Performance analytics: Track engagement metrics
- A/B testing: Test different copy variations
- Scheduling optimization: Post at optimal times based on analytics
Long-term
- Multi-account support: Manage personal + company accounts
- Content calendar: Visual planning interface
- Sentiment analysis: Ensure appropriate tone
- Automated hashtag research: Dynamic hashtag optimization
- Video snippet generation: Create short-form video content
- Newsletter automation: Repurpose for email campaigns
Key Learnings
Building this system taught me valuable lessons about automation and content marketing:
Technical Insights
- Prompt engineering is critical: A well-crafted AI prompt makes all the difference
- Webhook flexibility: Webhooks enable integration with any system
- Visual workflows: n8n’s visual editor makes complex automation understandable
- Error handling: Build in notifications for workflow failures
Content Strategy
- Platform optimization matters: Generic content performs poorly
- Approval workflows prevent mistakes: Review before publish is essential
- Batch processing is efficient: Handle multiple posts in one session
- Consistency builds audience: Regular posting drives engagement
Process Improvements
- Start simple, iterate: Begin with one platform and expand
- Document your prompts: Save successful AI prompts for reuse
- Monitor and adjust: Track what works and refine workflows
- Build for change: Design workflows that are easy to modify
Advice for Building Your Own
If you’re considering building a content automation system:
Start Small
- Begin with one platform (LinkedIn is great for B2B)
- Use a simple approval process (even just a checklist)
- Automate the most time-consuming tasks first
Invest in Quality Prompts
- AI is only as good as your prompts
- Study successful social media posts in your niche
- Include specific examples and counter-examples
- Build in validation checks
Plan for Scale
- Design modular workflows that can be duplicated
- Use environment variables for credentials
- Build error handling from the start
- Document your setup for future reference
Measure Results
- Track engagement metrics per platform
- A/B test different copywriting styles
- Analyze which content types perform best
- Iterate based on data
Conclusion
Building an automated content marketing system with n8n and Airtable has transformed how I manage my online presence. What used to take hours of manual work now runs automatically, with quality controls in place to ensure professional output.
The combination of visual workflow automation, AI-powered copywriting, human-in-the-loop approval, and multi-platform distribution creates a powerful system that scales with your content strategy.
Whether you’re a solo creator, small team, or growing company, this approach provides a foundation for efficient, consistent, high-quality content marketing without the manual overhead.
The best part? This is just the beginning. The modular architecture makes it easy to add new platforms, integrate additional AI capabilities, and optimize based on performance data.
Resources and Next Steps
Tools Used:
- n8n - Workflow automation platform
- Airtable - Collaborative database
- OpenAI API - AI copywriting
- LinkedIn API - Social media posting
Helpful Documentation: